

How To Set Up 1099 Vendor In Quickbooks Online
QuickBooks 1099 Vendor Setup
- Setting Upward 1099 Vendors in QuickBooks for Mac
- Setting Up 1099 Vendors in QuickBooks Online
Setting Up 1099 Vendors in QuickBooks for Windows
(Pro, Premier)
First: Create the Vendor Account, or edit it, if it was already created.
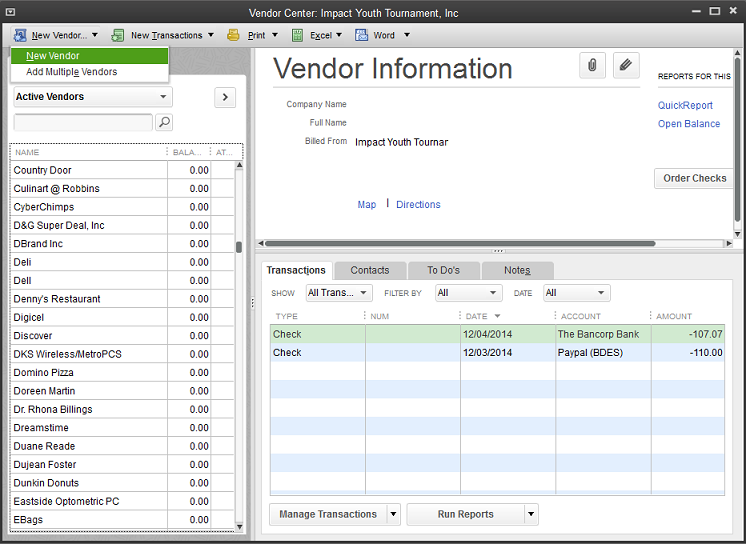
Step 1. In bill of fare bar, click Vendor then Vendor Center
Step ii. Select the vendor from the list of vendors or click on the dropdown button at New Vendor tiptop left of screen and select "New Vendor" as shown in the screenshot below to setup a new vendor.
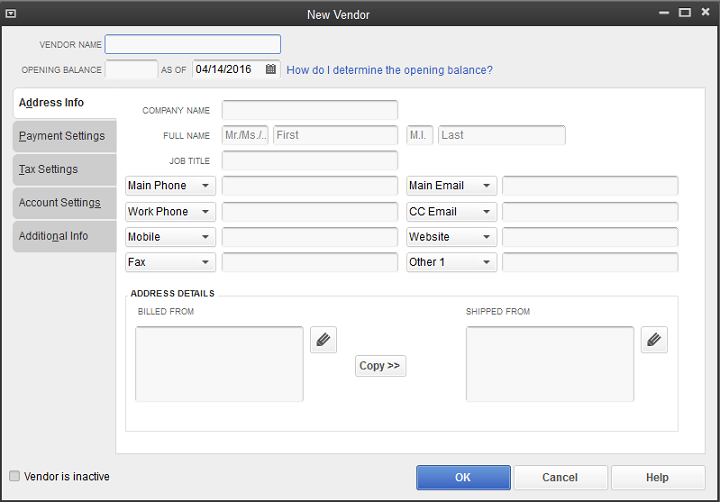
Pace 3. In new screen at Accost Info, enter Vendor's name, address, and contact info.
Step 4. Side by side, click on Tax Settings to the left of screen, and enter the vendor'south revenue enhancement ID number at the Vendor Tax ID: box, and cheque mark the box Vendor eligible for 1099
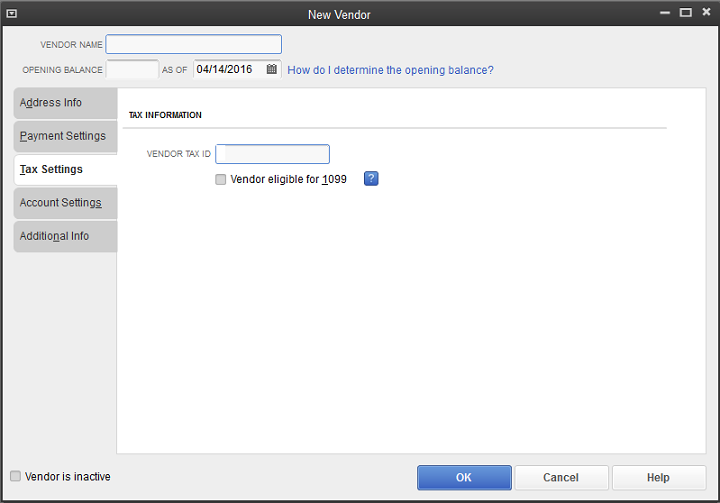
Footstep 5. Click OK.
How to Generate 1099s in QuickBooks
Then: After you have setup your vendors for 1099s in QuickBooks, you volition now need to setup the Preferences for 1099 Allocation past following these steps:
Step 1. Click on Edit in menu bar, and select Preferences
Footstep ii. In new screen, click on Tax: 1099 in left column, then Company Preferences. at top heart.
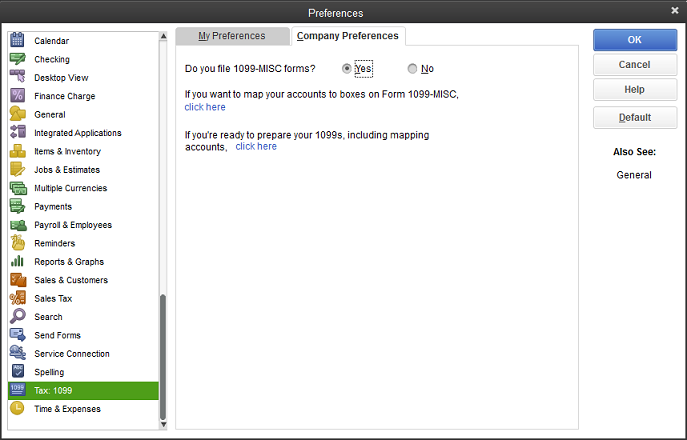
Step 3. Enter Yep to question "Do you lot file 1099-MISC forms?" then click on click here at "If yous want to map your accounts to boxes on Form 1099-MISC". In the new "QuickBooks 1099 Wizard" screen, you should meet all the associated vendor accounts that yous take check-marked as eligible for 1099 in the previous step.
Step 4. Click on the drop-down push button at "Apply payments to this 1099 box" for each account you will be preparing 1099's for, and select the business relationship from the list that will be associated with the vendor equally shown in screenshot below. (The most commonly used is the "Non-employee Bounty"). Likewise, if in that location are a lot of accounts to be mapped, and they are all "none employee bounty", you can check the box "Written report all payments in Box 7" at left of screen.
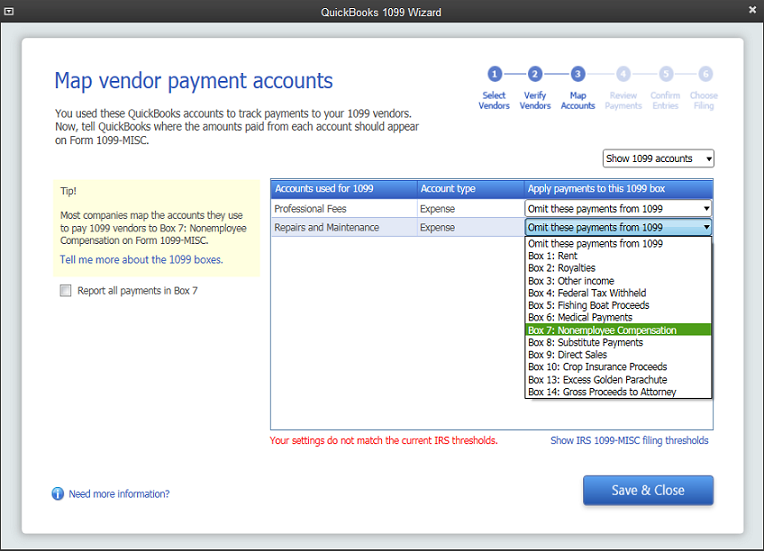
Step 5. Click Save & Close
To Impress 1099 Forms
When you are ready to print your 1099 forms, go to Edit, Preferences, Company Preferences and click click here at "If you're ready to prepare your 1099s, including mapping accounts" so Get Started. Ensure that all the vendors that are eligible for 1099 are checked, and click Continue, Continue, Continue...then Print 1099. You can use the "back" button if you demand to go dorsum and make edits. Likewise, be sure to preview the 1099 forms before printing them on your preprinted 1099 forms. Yous may demand to align them.
To Generate a 1099 Report
Become to Reports, Vendors & Payables, then 1099 Summary or 1099 Detail. This written report should contain all the vendors that you accept setup for 1099s that are eligible and have met the IRS threshold. If you did not collect W9's and take not been setting up each vendor for 1099 when y'all get-go created their account, yous can go to the vendor center, change the date to the fiscal year you lot are preparing 1099's for, and browse all vendors. You will encounter the amounts listed for each vendor as y'all highlight them, and also the method of payment. If y'all entered the correct method of payment in the check No. box when you lot wrote the checks, QuickBooks volition automatically exclude the payments that should not be included on 1099s. See Notations you lot can enter in the bank check number field so that QuickBooks can recognize and exclude ineligible payments from 1099's.

How To Set Up 1099 Vendor In Quickbooks Online,
Source: https://www.stepbystepquickbookstutorial.com/vendor/how-to-setup-vendors-for-1099-in-quickbooks-for-windows.html
Posted by: henryfark1951.blogspot.com
0 Response to "How To Set Up 1099 Vendor In Quickbooks Online"
Post a Comment